Patagonia stands as one of Earth’s most formidable wilderness destinations, where towering granite spires pierce storm-laden skies and ancient glaciers carve through primeval landscapes. For the solo backpacker, this remote region at the southern tip of South America presents both extraordinary rewards and significant challenges that demand meticulous preparation. The vast expanse encompasses diverse ecosystems across Chile and Argentina, from wind-scoured steppes to temperate rainforests, creating conditions that can shift from benign to life-threatening within hours.
Independent travellers venturing into these untamed lands must possess not only physical fitness and technical skills but also comprehensive knowledge of weather patterns, navigation techniques, and emergency protocols. The isolation inherent in Patagonian wilderness means that self-reliance becomes paramount, with rescue operations potentially days away even in optimal conditions. Success in this environment hinges upon thorough preparation across multiple domains, from physiological conditioning to gear selection and route planning.
Pre-departure physical conditioning and acclimatisation protocols
Patagonian expeditions demand exceptional physical preparedness, as the region’s challenging terrain and unpredictable conditions can quickly expose any weaknesses in your physiological conditioning. The multi-faceted approach to pre-departure training must address cardiovascular endurance, muscular strength, altitude adaptation, and environmental acclimatisation. Beginning your conditioning programme at least four months before departure allows sufficient time for physiological adaptations whilst reducing injury risk.
High-altitude training regimens for patagonian elevations
Although Patagonia’s peaks rarely exceed 3,000 metres, the combination of elevation, latitude, and severe weather conditions creates physiological stresses comparable to much higher altitudes elsewhere. Your training regimen should incorporate hypoxic conditioning through techniques such as breath-holding exercises, high-intensity interval training at maximum sustainable efforts, and gradual exposure to reduced oxygen environments. Many athletes utilise altitude training masks or visit high-altitude locations to stimulate red blood cell production and improve oxygen utilisation efficiency.
The acclimatisation process extends beyond simple altitude adaptation to encompass the unique atmospheric conditions of the southern latitudes. Low barometric pressure systems frequently traverse the region, creating additional respiratory stress that compounds elevation effects. Incorporating VO2 max training sessions twice weekly, combined with extended aerobic activities at 70-80% maximum heart rate, builds the cardiovascular foundation necessary for sustained exertion in oxygen-depleted conditions.
Cardiovascular endurance programmes for Multi-Day trekking
Multi-day trekking circuits in Patagonia routinely involve 8-12 hours of daily hiking across varied terrain, demanding exceptional cardiovascular fitness and muscular endurance. Your training programme should emphasise sustained aerobic activities that mirror the demands of extended backpacking, including long-distance hiking with weighted packs, trail running on uneven surfaces, and cycling for active recovery sessions. The key lies in building aerobic capacity whilst developing the specific muscle groups utilised during extended hiking with heavy loads.
Progressive overload principles apply to endurance training, beginning with shorter sessions and gradually increasing duration and intensity. Incorporate back-to-back training days to simulate the cumulative fatigue experienced during multi-day expeditions, as your body must adapt to performing whilst already fatigued. This approach develops both physiological resilience and mental toughness essential for maintaining safety margins when exhausted in challenging conditions.
Load-bearing training with weighted pack systems
Carrying expedition loads of 18-25 kilograms across Patagonian terrain places enormous stress on your musculoskeletal system, particularly the core, legs, and stabilising muscles. Your conditioning programme must systematically prepare these structures through progressive weight loading that begins conservatively and builds to exceed expected expedition loads. Start with 10-12 kilogram packs for short distances, increasing weight by 2-3 kilograms weekly whilst extending hiking duration.
Focus particular attention on developing eccentric muscle strength through downhill hiking with weighted packs, as descents place tremendous stress on knee joints and quadriceps muscles. Incorporate functional strength exercises such as weighted step-ups, single-leg squats, and unilateral deadlifts to address muscular imbalances and improve stability on uneven terrain. The stabilising muscles of your feet and
stabilising muscles of your feet and ankles benefit from balance work on wobble boards, slacklines, or simple single-leg stands with eyes closed. Aim to complete at least one dedicated load-bearing session per week three months out from departure, building to two weekly sessions in the final month. This gradual approach helps condition connective tissues and reduces your risk of overuse injuries such as patellar tendinopathy or plantar fasciitis once you are carrying a full expedition pack across Patagonian passes.
Simulating real trail conditions is particularly valuable for solo trekking in Patagonia, where you cannot offload gear to partners. Whenever possible, train on similar terrain: uneven forest tracks, loose scree, muddy paths, and long gravel roads in high winds. Use the same backpack, footwear, and trekking poles you intend to bring to Patagonia so you can fine-tune strap adjustments and pole length. This familiarity with your equipment under realistic loads will pay dividends when you are several days from the nearest road and need every system to work seamlessly.
Cold weather acclimatisation techniques and exposure therapy
Patagonian weather is notorious for its abrupt temperature drops, penetrating wind chill, and cold rain that can rapidly sap body heat. Preparing your body and mind for sustained cold exposure reduces the likelihood of hypothermia and frostnip during your solo backpacking journey. Cold acclimatisation begins at home by gradually increasing your exposure to low temperatures during training sessions: hiking in colder conditions, reducing the number of insulating layers, and avoiding overdressing on moderate days so your body learns to generate and retain heat efficiently.
Some athletes incorporate controlled cold exposure protocols such as brief cold showers, ice baths, or open-water swimming to accelerate physiological adaptation. These methods can improve peripheral circulation and mental tolerance to discomfort, but they must be introduced cautiously to avoid shock and excessive fatigue. Always prioritise safety: cold exposure should be progressive, time-limited, and followed by thorough rewarming. Remember that in Patagonia, wet and windy conditions are more dangerous than simple low temperatures, so training your response to being simultaneously cold, damp, and tired is crucial.
Mental acclimatisation is equally important. Extended periods of discomfort can erode decision-making capacity, especially when travelling solo in Patagonia’s remote zones. During your training hikes, practise recognising early signs of cold stress—such as fumbling with zips, sluggish thinking, or unusual apathy—and rehearse your response: adding layers, eating high-energy snacks, increasing pace, or setting up shelter. By turning these responses into automatic habits before you depart, you maintain a wider safety margin when real storms descend on the steppe or the passes above Torres del Paine.
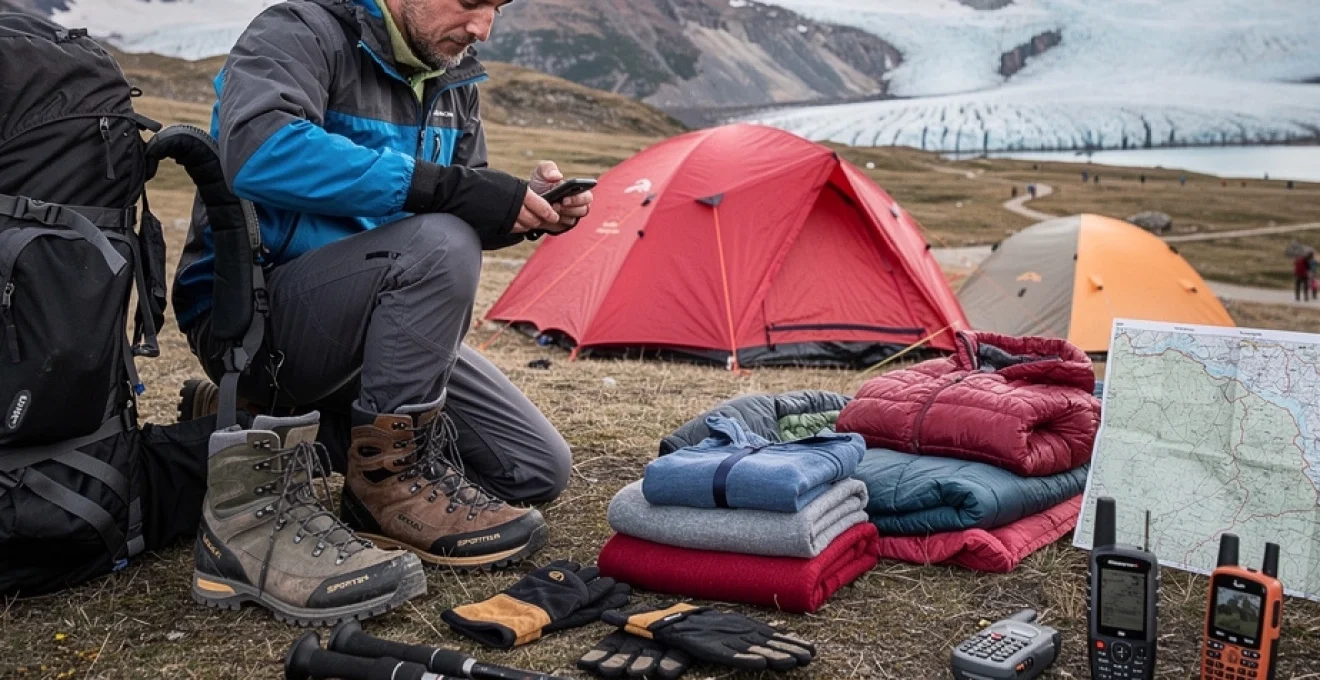
Essential gear selection for patagonian weather extremes
Equipment choices for solo travel in Patagonia must account for violent wind, persistent moisture, and rapid changes in temperature. Gear failure in this environment can quickly escalate into an emergency, particularly when you are days away from trailheads or refugios. Selecting robust, field-proven equipment—rather than the lightest option on the market—often represents the safest strategy for independent backpackers. Your shelter, clothing, navigation tools, and footwear must function as an integrated system that keeps you dry, warm, and oriented even when forecasts prove inaccurate.
When evaluating gear for a solo backpacking trip in Patagonia, prioritise redundancy in critical systems such as fire-starting, navigation, and waterproofing. While ultralight philosophies dominate many long-distance hiking communities, Patagonia rewards a more conservative approach. A slightly heavier four-season tent, a genuinely waterproof shell, or a more powerful satellite communicator can make the difference between an uncomfortable storm and a life-threatening situation. The following sections examine key gear categories and compare specific expedition-grade options suited to Patagonian conditions.
Four-season shelter systems: hilleberg vs MSR expedition tents
In an environment where 100 km/h gusts are not uncommon and ground conditions vary from rocky moraine to saturated peat, your tent becomes your primary life-support system. Among experienced Patagonian guides and solo trekkers, four-season tents from Hilleberg and MSR frequently emerge as top choices. Both manufacturers produce expedition-grade shelters designed to withstand heavy snow loading and extreme wind, but they differ in design philosophy, weight, and setup complexity.
Hilleberg’s Keron and Nallo series are classic tunnel tents known for exceptional wind stability when properly oriented and guyed out. Their outer-first pitch design is invaluable in Patagonia, allowing you to set up in heavy rain without soaking the inner tent. The continuous pole sleeves and multiple guy points distribute wind forces efficiently, though these tents require more care in site selection and alignment relative to wind direction. Weight is higher than many three-season shelters, but the security they provide on exposed passes or along open steppe can justify every extra gram for a solo expedition.
MSR’s expedition offerings, such as the Remote or Access series, utilise a dome or geodesic architecture that excels when wind direction shifts unpredictably. Freestanding or semi-freestanding designs simplify pitching on rocky ground where staking options are limited—a common scenario in Torres del Paine and Los Glaciares. These tents often provide slightly more interior volume relative to weight, which can improve comfort during multi-day storm lock-ins. However, many MSR models pitch inner-first, requiring a quick, practised setup sequence to avoid water ingress when erecting them in Patagonian rain. Whichever brand you choose, invest time before departure to master pitching and re-pitching in strong winds, ideally in low-light conditions.
Layering systems: merino wool base layers and synthetic insulation
Effective temperature regulation during solo trekking in Patagonia depends on a flexible layering system that copes with intense effort on climbs and sudden chills on exposed ridges. At the foundation of this system, merino wool base layers offer an excellent balance of moisture management, odour resistance, and comfort over multi-day itineraries. A 150–200 gsm merino top and bottom provide versatility across most of the Patagonian season, while a heavier 250 gsm piece can serve as a dedicated sleep layer in colder months or at higher elevations.
For mid-layers, synthetic insulation often outperforms down in the damp Patagonian climate, where repeated wetting and imperfect drying conditions are common. Jackets utilising Primaloft, Coreloft, or similar technologies retain more warmth when damp and dry faster than down equivalents, making them particularly suitable for solo travellers who may not have the luxury of refugio stoves every night. A lightweight synthetic hoody combined with a stretch fleece layer provides modular warmth that can be adjusted quickly as weather systems move through.
Your outer shell must be unequivocally waterproof and highly wind-resistant. Look for jackets with a proven three-layer membrane, fully taped seams, and features built for high wind: helmet-compatible hoods with strong brim reinforcement, substantial cuff closures, and hem drawcords that can be operated with gloves. Trousers should be equally robust; full-length side zips facilitate rapid ventilation and on-the-move layer changes when storms build over the Southern Patagonian Ice Field. Consider the entire system as you would a climbing rack: each piece must serve multiple roles and work reliably with the others.
Navigation equipment: garmin inreach vs spot satellite communicators
Reliable communication and navigation tools are essential for solo backpacking in Patagonia, where mobile phone coverage is patchy or non-existent once you leave road corridors. Satellite communicators offer two primary benefits: emergency SOS signalling and routine two-way messaging that allows you to update loved ones or adjust logistics. Garmin inReach and Spot devices dominate this segment, but they differ in capability, subscription models, and integration with mapping tools.
Garmin inReach devices combine GPS navigation with two-way satellite texting via the Iridium network. This allows you not only to trigger an SOS but also to exchange detailed messages with rescue coordination centres or contacts, which can be crucial when describing injuries, requesting specific supplies, or updating your route plan. Many solo trekkers appreciate the ability to download topographic maps, track their path, and set waypoints directly on the device, reducing the need to handle a smartphone in foul weather. Subscription plans are more expensive than basic Spot offerings, but the flexibility and information richness can be decisive during complex incidents.
Spot units typically prioritise one-way messaging and tracking, using the Globalstar network. They excel as lightweight, lower-cost beacons that can regularly transmit your position to a web map—reassuring for friends and family following your Patagonia solo trip from afar. Newer Spot X models add two-way texting, though interface and mapping integration are generally less sophisticated than Garmin’s ecosystem. If your budget is tight and you are comfortable relying on separate navigation tools such as a dedicated GPS and paper maps, a Spot device paired with strong route-planning skills can still provide a significant safety net in the Patagonian backcountry.
Footwear selection: la sportiva nepal cube vs scarpa mont blanc
Footwear for independent trekking in Patagonia must tackle long days under load, frequent river crossings, and, in some itineraries, glacier approaches or early-season snow. For technical routes that include crampon use—such as ascents in the Fitz Roy massif or exploratory trips near the ice fields—high-altitude style boots like the La Sportiva Nepal Cube and the Scarpa Mont Blanc represent proven options. Both models offer full crampon compatibility, substantial ankle support, and insulation suitable for sub-zero mornings on high passes.
The La Sportiva Nepal Cube is slightly lighter and often praised for its precise fit and edging performance on mixed terrain, making it popular among mountaineers tackling steep, technical routes. Its reduced weight can be an advantage on long days, but the more performance-oriented last may feel constrictive for wider feet. The Scarpa Mont Blanc, by contrast, tends to offer a roomier toe box and a slightly more forgiving fit, which some long-distance trekkers prefer when spending 8–10 hours a day on the move. Its robust construction handles the abrasive volcanic rock and moraine fields common in Torres del Paine and Los Glaciares.
If your Patagonia itinerary focuses primarily on established trekking circuits such as the W Circuit or the main trails around El Chaltén, a slightly lighter three-season boot or even a high-quality trail runner may suffice in peak season. However, for shoulder-season travel, off-trail exploration, or glacier approaches, the security and insulation of boots in the Nepal Cube or Mont Blanc class provide a considerable safety margin. Whatever option you select, break your footwear in thoroughly, test it with full expedition loads, and pair it with appropriate gaiters to keep out the ubiquitous Patagonian grit.
Route planning through torres del paine and los glaciares
Strategic route planning is the backbone of a safe and rewarding solo trip in Patagonia. The iconic circuits of Torres del Paine and Los Glaciares attract thousands of visitors each season, yet their remoter sections still demand serious logistical thought. Distances between camps, mandatory reservations, seasonal closures, and weather-dependent crossings all influence your daily stages. As a solo traveller, you must plan conservatively, building in buffer days and understanding your escape options should conditions deteriorate.
Modern tools—from detailed topographic maps to GPS tracks and satellite imagery—make it easier than ever to visualise your journey before you set foot on the trail. However, these digital conveniences must be tempered with realistic assessments of your fitness, pack weight, and cold-weather tolerance. When in doubt, shorten daily distances, add extra nights at strategic camps, and leave room for the inevitable day when the Patagonian wind makes progress unsafe or unwise.
W circuit vs O circuit: technical difficulty assessment
The W Circuit and the O Circuit in Torres del Paine represent two distinct experiences in terms of commitment, remoteness, and technical demands. The W, typically completed in 4–5 days, focuses on three main valleys—Grey, Francés, and the Towers—and benefits from more frequent infrastructure, including refugios, boat links, and relatively high hiker traffic. Trails are well-marked, and daily distances can be tailored to moderate fitness levels, making the W an ideal introduction to solo trekking in Patagonia for those with solid backpacking experience but limited exposure to truly remote travel.
The O Circuit, by contrast, encircles the entire Paine massif over 7–10 days and includes a committing crossing of the John Gardner Pass. The northern and western sections of the circuit are significantly more isolated, with fewer bail-out options and stricter control from park rangers due to environmental and safety concerns. While the technical difficulty remains within non-technical trekking standards—no ropes or advanced mountaineering skills are required—the cumulative elevation gain, exposure to weather, and mandatory daily stages raise the bar. Solo backpackers on the O Circuit must be fully self-reliant in navigation, campcraft, and injury management.
When deciding between the W and O routes for a solo trip to Patagonia, consider not just your physical conditioning but also your psychological comfort with isolation. Do you feel confident spending multiple days where you may see only a handful of other hikers, with no quick exit if you twist an ankle? If the answer is uncertain, starting with the W and perhaps adding side trips from established camps offers an excellent balance of challenge and safety as you build toward more ambitious circuits.
Fitz roy circuit: permits and weather window analysis
Across the border in Argentina, Los Glaciares National Park offers world-class trekking around the Fitz Roy and Cerro Torre massifs. While popular day hikes to Laguna de los Tres and Laguna Torre require no permits beyond standard park entry, more ambitious multi-day circuits and high passes demand careful attention to regulations and weather. Some routes—such as the Huemul Circuit or glacier approaches near Paso del Viento—may be subject to seasonal closures or informal recommendations from local rangers based on current conditions.
Compared with Torres del Paine, permit procedures in the El Chaltén area are generally less bureaucratic, but this should not lull solo travellers into complacency. Strong westerly winds funnelling off the Southern Patagonian Ice Field can transform benign forecasts into hazardous whiteouts within hours. Wind gusts exceeding 80–100 km/h are not uncommon during spring and autumn shoulder seasons, forcing experienced parties to retreat from exposed ridgelines or abandon planned crossings. When targeting a specific weather-dependent objective—such as a sunrise at Laguna de los Tres during your Patagonia solo trek—build a multi-day window into your itinerary rather than banking on a single perfect morning.
Local weather models and ranger briefings are invaluable. Rangers in El Chaltén often maintain up-to-date information on snow cover, river levels, and recent incidents, offering nuanced advice that global forecast apps cannot match. Treat their recommendations with the same respect you would accord an avalanche bulletin in alpine regions. Ultimately, your willingness to adjust or even abandon planned routes in response to evolving conditions is a core element of responsible independent travel in Patagonia.
Escape route identification and emergency evacuation points
One of the most overlooked aspects of solo route planning in Patagonia is the identification of escape routes and evacuation points. Before you depart, trace not only your intended path on the map, but also alternative descent lines, connector trails, and locations with road access or boat crossings. On the O Circuit, for example, key junctions near Refugio Grey, Paine Grande, and Laguna Amarga offer potential exits via ferry or bus if injury, equipment failure, or extreme weather renders continuation unsafe.
In Los Glaciares, familiarise yourself with the network of trails leading back to El Chaltén, as well as the few road-accessible points such as Hostería El Pilar. Consider how long it would take you to reach these evacuation points from various stages of your trek, factoring in reduced pace if you are injured or assisting another hiker. Mark potential helicopter landing zones—flat, open areas free of overhead lines—on your map as well; even if air evacuation is unlikely, having such locations identified can speed coordination with rescue teams should the need arise.
During your solo backpacking journey in Patagonia, continuously update your mental picture of escape options as you move. A river that was ankle-deep on the approach might become impassable after a night of rain, forcing you to reverse course or take a longer bypass. Treat route flexibility as an essential safety tool rather than a sign of poor planning. The most successful independent travellers in Patagonia are those who can quickly pivot from Plan A to Plan C when reality diverges from their spreadsheets.
Water source mapping and purification requirements
Abundant surface water is one of Patagonia’s great advantages for long-distance trekking, but it also presents unique challenges. Glacial streams, snowmelt rivulets, and tarns dot most major circuits, allowing solo hikers to carry less water weight than in arid regions. However, livestock grazing, upstream campsites, and wildlife can introduce microbial contamination even in seemingly pristine waters. Mapping reliable sources and planning purification protocols keeps your hydration strategy robust without compromising safety.
Before departure, study route descriptions and topographic maps to identify guaranteed water points—major rivers, large lakes, and streams flowing out of glaciers—and note approximate distances between them. On heavily trafficked sections of the W Circuit or popular trails around El Chaltén, assume that all water near camps, refugios, and main paths requires treatment. Farther afield, you may still wish to filter or chemically treat water for redundancy, especially early in your solo trek when gastrointestinal illness would be most disruptive.
Lightweight squeeze filters or pump filters provide rapid purification for daily use, while chemical tablets or drops serve as a backup in case of mechanical failure or freezing temperatures that compromise filter elements. Some solo trekkers carry a compact UV purifier as a third line of defence, though these devices rely on charged batteries and clear water. A simple rule applies: if you have any doubt, treat the water. Dehydration in Patagonia can creep up on you, particularly on windy days where sweat evaporates instantly, so adopt a proactive hydration strategy rather than drinking only when thirsty.
Wilderness risk management and Self-Rescue protocols
Risk management for solo trekking in Patagonia extends far beyond carrying a satellite beacon. It involves a continuous cycle of hazard identification, assessment, mitigation, and review. Common risks include high winds, rapidly rising rivers, hypothermia, navigation errors in low visibility, and overuse injuries from carrying heavy loads. Before your trip, conduct a formal risk assessment for each segment of your route, listing potential hazards and pre-planned responses. This may feel bureaucratic, but it trains your mind to think proactively rather than reactively once you are in the field.
Self-rescue skills form a critical part of this framework. At a minimum, solo backpackers in Patagonia should be competent in basic wilderness first aid, including splinting, wound management, hypothermia treatment, and recognition of altitude and cold-related illnesses. Consider completing a wilderness first aid or wilderness first responder course before your journey; these programmes emphasise improvisation with limited equipment, a scenario highly relevant to remote Patagonian valleys. Carry a concise, well-organised medical kit and rehearse using each item so you are not reading instructions by headlamp in a gale.
Decision-making under stress is another key competency. Establish objective turnaround times and weather thresholds before you set out each day: maximum wind speeds for exposed ridges, river depth limits for safe crossings, or hard cut-off times for reaching camp before dark. Writing these parameters in your trip notebook can help counter the summit fever or schedule pressure that often leads to poor choices. When conditions deteriorate, ask yourself, “If I were advising a friend in this situation, what would I tell them to do?” This simple mental reframing can cut through ego and sunk-cost bias, guiding you toward safer decisions even when alone.
Patagonian weather pattern analysis and forecasting
Understanding Patagonian weather patterns is akin to learning a foreign language: the more fluent you become, the less likely you are to be surprised. The region lies in the path of the roaring forties and furious fifties—bands of strong westerly winds circling the globe. Moist air masses from the Pacific slam into the Andes, rising rapidly and shedding enormous amounts of precipitation on the western slopes while creating dramatic rain shadows to the east. For the solo backpacker, this means you can hike from driving rain to bright sun in the space of a single pass, only to see conditions reverse hours later.
Global forecast models accessed via apps provide a useful starting point but often struggle with microclimates around complex terrain such as the Paine massif or the Fitz Roy group. Supplement them with region-specific tools like Windguru and local meteorological services, paying particular attention to wind speed, gusts, and freezing levels rather than just temperature and rainfall probability. When possible, download multi-day forecasts to your GPS or satellite communicator before entering areas without data coverage, and update them whenever you pass through refugios or ranger stations with Wi-Fi.
On the ground, practise reading the sky. Rapidly building lenticular clouds stacked over peaks often signal strengthening winds and incoming fronts. A sudden shift in wind direction or intensity can indicate the passage of a trough or the approach of a low-pressure system. In summer, katabatic winds descending from glaciers may intensify in the afternoon, making early starts particularly valuable on exposed ridges or lake crossings. Over time, you will learn to treat the official forecast as a broad canvas and the visible sky as the fine brushwork that determines your hourly decisions.
Backcountry nutrition planning for extended isolation
Effective nutrition planning underpins your capacity to perform and make sound decisions during a solo trip in Patagonia. Multi-day trekking with a 20+ kilogram pack in cold, windy conditions can easily push daily energy expenditure into the 3,500–5,000 kcal range, depending on body size and route difficulty. Under-fuelling over several days leads to cumulative fatigue, impaired thermoregulation, and increased injury risk—exactly what you want to avoid in remote valleys far from assistance.
Design your food system with three priorities: energy density, ease of preparation in bad weather, and macronutrient balance. High-fat, calorie-dense items such as nuts, nut butters, olive oil, and hard cheeses provide substantial energy per gram and perform well in cool climates. Complement these with complex carbohydrates—oats, couscous, instant rice, dehydrated potatoes—to replenish glycogen after long days. Include meaningful protein sources at each meal, such as jerky, dehydrated beans, or freeze-dried meals with 20–30 grams of protein per serving, to support muscle repair and immune function.
For solo backpacking in Patagonia, consider structuring your daily intake around a substantial breakfast, frequent grazing snacks, and a hot evening meal that doubles as a psychological anchor after challenging days. Plan at least one extra full day of food as an emergency buffer in case storms pin you down at a campsite or force unplanned detours. Packaging matters: re-bag bulk items into robust, labelled zip bags that fit efficiently into bear-resistant bags or odour-proof liners, even though large mammals are less of a concern here than in North America. Simplicity is your ally; the best trail food is the food you will still want to eat when you are exhausted, windswept, and watching another squall roll in across the Patagonian steppe.